|
E-Mail Related Features Tutorial
The Control Panel gives you control over email settings via your browser. Simply click and point.
It allows you to create and modify email aliasing, email forwarding and autoresponders, catch all email address and many non-email, web site hosting hosting related features.
The examples on this page are for domain bellypleasers.com. Simply replace that domain name with your
own when configuring email features.
1. Email Forwarding
Login to your web site's control panel and click the "Email Config" button.
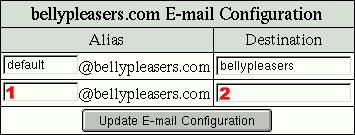
Enter the username part of the email address in the 'Alias' (1)
box. Enter the destination email address in the 'Destination' (2)
box and click the button.
Mail sent to sales@bellypleasers.com will now automatically be forwarded
to joe@example.com. Changes to the forwarding configuration are made real-time.
2. Email Aliasing
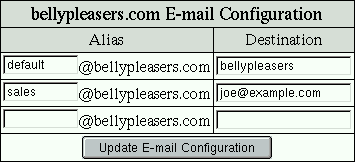
Login to your web site's control panel and click the "Email Config" button.
Enter the username part of the email address in the 'Alias' (1)
box. Enter the destination mailbox (POP3 account) in the 'Destination' (2)
box and click the button.
Mail sent to sales@bellypleasers.com will now be delivered in mailbox
bellypleasers5. For information on how to configure your email software
to fetch email for the mailbox (POP3 account) you selected, see the bottom
of the "Email Config" page in your web hosting control panel.
Changes to the aliasing configuration are made real-time.
3. Catch all email address
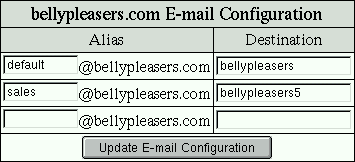
Login to your web site's control panel and click the "Email Config" button.
The 'default' entry is where all email for this domain will be sent to,
unless otherwise defined (as in the examples above).
Simply change the email address (or mailbox)
in the 'Destination' box next to the default entry to change the catch all
email address (mailbox).
4. Autoresponders
An autoresponder allows for automated email responses. For example, sending
an email to prices@example.com would automatically send you an email with
current pricing. You can also use autorespoders to notice people the email
they have sent to you have been received.
Login to your web site's control panel and click the "Autoresponders" button.

Enter the username part of the autoresponder email address in the empty
box (1) and click the button.
On the next page, you can enter the text for the autoresponder and customize
the subject line it will use. Click the button when done.
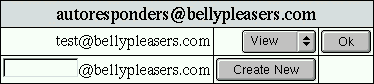
You can now view/modify/delete your newly created email autoresponder.
All of the above features are included will all web hosting accounts.
|