|
Shopping Cart Tutorial - Building A Catalog
1. Adding Products
Now that the software knows a few things about the merchant and the
items (products or services) for sale, you can start building your online catalog.
Create the shopping cart web pages as you would any page.
For each item, simply add a few lines of .html.
You can either read on and create the .html manually, use the
DreamWeaver, or GoLive extension. You can also have
the control panel do it for you.
Select the 'Create Cart html' option in the drop-down next to your
merchant profile for an easy to use form.
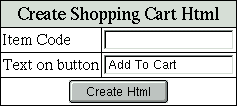
Enter the item number and text to use on the order button. The next page
will show the exact .html to use which you can quickly copy into a catalog/carts page.
To do things manually, use the below .html.
<FORM METHOD="POST" ACTION="/cgi-yourdomain/basket">
<INPUT TYPE="HIDDEN" NAME="command" VALUE="enter">
<INPUT TYPE="HIDDEN" NAME="merchant" VALUE="merchant_id">
<INPUT TYPE="HIDDEN" NAME="item" VALUE="product_id">
<INPUT TYPE="SUBMIT" VALUE="Add To Order">
</FORM>
|
|
Some of these lines will need to be modified slightly.
Line one :
|
<FORM METHOD="POST" ACTION="/cgi-yourdomain/basket">
|
|
Replace yourdomain by your domain name without the . extension.
If your domain is abccompany.com, you would have the below line :
|
<FORM METHOD="POST" ACTION="/cgi-abccompany/basket">
|
|
If, this is not clear to you, check the shopping
cart script documentation pages in the control panel, this will give you the exact .html code
to use.
Do not modify line two. Doing so will make it so that the script will
not work. Copy it exactly as above.
Line three :
|
<INPUT TYPE="HIDDEN" NAME="merchant" VALUE="merchant_id">
|
|
Replace "merchant_id" with the merchant ID you have created.
If you had created merchant ID "abccompany", line three of the shopping cart code would read :
|
<INPUT TYPE="HIDDEN" NAME="merchant" VALUE="abccompany">
|
|
Line four :
|
<INPUT TYPE="HIDDEN" NAME="item" VALUE="product_id">
|
|
The "product_id" needs to be replaced by the "Item" code you
created for this item. So, if these lines of .html
code were being added for a product with "Item" code "abcproduct1",
line four would read :
|
<INPUT TYPE="HIDDEN" NAME="item" VALUE="abcproduct1">
|
|
You can change the "VALUE" attribute in line five.
This is optional while building shopping cart pages.
Do not modify line six. Doing so will make it so that the script
will not work. Copy it exactly as above.
If you are building multiple products entries on a catalog web page (which is likely)
you need to repeat the steps in Create Catalog for each cart item.
The following are advanced cart features and are not required to build a
shopping cart web site.
2. Multiple Sizes/Colors/Fabrics
If products available in different sizes, colors, fabrics and such
are being offered, this most powerful cart feature will come in very
handy. As explained earlier, you will need an "Item" code for each
version (size, color, fabric,...) of the product in the shopping cart.
Say you sell widgets. Widgets come in three sizes and two
colors. You've assigned "Item" codes as follows :
| Item | Actual Product |
| widgetsmallgreen | Small Green Widget |
| widgetmediumgreen | Medium Green Widget |
| widgetlargegreen | Large Green Widget |
| widgetsmallblue | Small Blue Widget |
| widgetmediumblue | Medium Blue Widget |
| widgetlargeblue | Large Blue Widget |
|
In this case, you would use the below .html code (after customizing
line one and three) :
<FORM METHOD="POST" ACTION="/cgi-yourdomain/basket">
<INPUT TYPE="HIDDEN" NAME="command" VALUE="enter">
<INPUT TYPE="HIDDEN" NAME="merchant" VALUE="merchant_id">
<INPUT TYPE="HIDDEN" NAME="item" VALUE="widget">
<SELECT NAME="option1">
<OPTION VALUE="small">
<OPTION VALUE="medium">
<OPTION VALUE="large">
</SELECT>
<SELECT NAME="option2">
<OPTION VALUE="green">
<OPTION VALUE="blue">
</SELECT>
<INPUT TYPE="SUBMIT" VALUE="Add To Order">
</FORM>
|
|
This will give shoppers drop-down menus to select size and color.
When the "Add To Order" button is pressed, the
shopping cart script does the following :
- it gets the value for field "item"
- it gets the value for field "option1" & "option2"
- it combines these values to get the full Item code
If a shopper selects "medium" and "green", the script gets
the following values : "widget" + "medium" + "green" which tells it
the Item code is "widgetmediumgreen" (see above).
Please note that Item codes are case sensitive (see Getting Started) and that
the order of the "option" fields is very important. If you had
made "option1" the color and "option2" the size, the shopping cart
script would have gotten value "widgetgreenmedium" for the Item
code which is not in the product database for this example and is
an invalid Item code.
Fields "option1" to "option5" are ready for use, so you can have up
to five factors (such as color, size, fabric) for each product.
3. Adding Multiple Items Simultaneously
To add multiple items to the shopping cart at once, use this :
<FORM METHOD="POST" ACTION="/cgi-yourdomain/basket">
<INPUT TYPE="HIDDEN" NAME="command" VALUE="multi">
<INPUT TYPE="HIDDEN" NAME="merchant" VALUE="merchant_id">
<INPUT TYPE="HIDDEN" NAME="item1" VALUE="widget">
<INPUT TYPE="TEXT" NAME="quant1" VALUE="0">
<INPUT TYPE="HIDDEN" NAME="item2" VALUE="widget">
<INPUT TYPE="TEXT" NAME="quant2" VALUE="0">
<INPUT TYPE="SUBMIT" VALUE="Add To Order">
</FORM>
|
|
For each item, declare a item and quantity field and increase
the number in the fieldnames by one for each item.
4. Automated Price Updates
Instead of manually entering a price for each item on your catalog pages, you can have the price
inserted directly from the product database.
Instead of using this :
you can use :
|
Price : <!--#include virtual="/cgi-yourdomain/basket?command=price&merchant=merchant_id&item=widget" -->
|
|
Important : make sure the text to insert the price is on a signle line, not two lines as shown above. Visitors to your web site will see (for example) :
Whenever you update prices in the shopping cart database, the prices shown on your web pages
will reflect the new prices.
|